
Two Lanes on the Information Superhighway:
Using Multiple Internet Connections
Load Balancing with a Dlink DI-LB604 router
By Frank Cox
(October 4, 2010)
Updated October 4, 2010 – Shortly after writing this article on April 25, 2008, I discovered that the Dlink DI-LB604 router didn't work well (or at all) with encrypted (ssh) communications channels. However, updated firmware is now available for this router that appears to fix this issue. Click here to download Firmware Version:v.1.02 Built Date: Dec 16 2009. The filename is DI-604LBVPN_V102_IB0F_Formal_Release_12162009.img .
Two separate broadband connections of any type, either Cable or DSL, may be used concurrently on your network for increased bandwidth through load balancing, and automatic failover.
SUMMARY
You can have two separate Internet connections (two Internet accounts) and use both of them at the same time to increase your available bandwidth and speed. You will get there faster when doing anything from loading web pages to playing online games.
This article attempts to cover everything you need to set up to run dual Internet connections through a load balanced router, including wireless access.
WHAT YOU GET
Being able to use two Internet connections at the same time has two major advantages.
The main advantage for most of us is that you will increase your total available bandwidth, both uploading and downloading, and see much snappier performance from just about everything on your network. Web pages load faster and big downloads won't hog your connection and slow everything else down.
Due to the nature of Bittorrent, file transfers using the Bittorrent protocol can take full advantage of your dual Internet connections.
When you have multiple users on your network, the dual connections can also also insure that everyone on your network gets adequate bandwidth to do whatever they're attempting to accomplish. You're spreading the load of serving all of the clients across two connections, after all.
Automatic failover is another advantage to be had when using two Internet connections simultaneously. If one of your connections fails for any reason, the other can take up the load and everything continues to work. With a single connection, of course, if that connection drops then it's game over until the connection is fixed. In addition to extra bandwidth for your daily use, the second connection can carry the whole load if it has to. After all, slower is better than zero.
WHAT YOU DON'T GET
The system for using dual Internet connections as described here doesn't provide faster download or upload speeds from such things as FTP servers, where you're using a single connection to transfer a single file. It does, however, help to prevent a single large download from using up all of the available bandwidth. You can be downloading a large file and still do other things (check your email, read web pages and even start downloading another large file) at pretty much the same speed you could do it before the download had started. A single file transfer may use all or most of the available bandwidth on one of your connections, but the other is still available to do other work.
In other words, a file transfer speed test on a website like this won't provide results that look much different either before or after you set up the dual Internet connections. But you will be able to run two instances of that speed test at the same time and still see the same results that you would if you ran a single speed test.
THEORY OF OPERATION, AND AN EXAMPLE
The objective of load balancing is to share the total demand for bandwidth across two separate connections. This can speed up the loading of a web page, for example, by downloading the graphics in parallel across both connections.
Here is what the Apache web server log looks like when I load the web page found at melvilletheatre.com. This is an actual snippet from my webserver log. For clarity and brevity, I have replaced my actual IP addresses in this log snippet with 1.1.1.1 and 2.2.2.2. IP address 1.1.1.1 is a cable modem and 2.2.2.2 is a DSL modem; each one is from a different Internet Service Provider.
1.1.1.1 - - [25/Apr/2008:02:42:39 -0600] "GET / HTTP/1.0" 200 3688 "-" "Mozilla/5.0 (X11; U; Linux x86_64; en-US; rv:1.8.1.14) Gecko/20080416 Fedora/2.0.0.14-1.fc8 Firefox/2.0.0.14"
2.2.2.2 - - [25/Apr/2008:02:42:39 -0600] "GET /whlchair.gif HTTP/1.0" 200 2181 "http://www.melvilletheatre.com/" "Mozilla/5.0 (X11; U; Linux x86_64; en-US; rv:1.8.1.14) Gecko/20080416 Fedora/2.0.0.14-1.fc8 Firefox/2.0.0.14"
2.2.2.2 - - [25/Apr/2008:02:42:39 -0600] "GET /crap.png HTTP/1.0" 200 2708 "http://www.melvilletheatre.com/" "Mozilla/5.0 (X11; U; Linux x86_64; en-US; rv:1.8.1.14) Gecko/20080416 Fedora/2.0.0.14-1.fc8 Firefox/2.0.0.14"
2.2.2.2 - - [25/Apr/2008:02:42:39 -0600] "GET /spinreel.gif HTTP/1.0" 200 9988 "http://www.melvilletheatre.com/" "Mozilla/5.0 (X11; U; Linux x86_64; en-US; rv:1.8.1.14) Gecko/20080416 Fedora/2.0.0.14-1.fc8 Firefox/2.0.0.14"
2.2.2.2 - - [25/Apr/2008:02:42:39 -0600] "GET /melville.gif HTTP/1.0" 200 20449 "http://www.melvilletheatre.com/" "Mozilla/5.0 (X11; U; Linux x86_64; en-US; rv:1.8.1.14) Gecko/20080416 Fedora/2.0.0.14-1.fc8 Firefox/2.0.0.14"
2.2.2.2 - - [25/Apr/2008:02:42:39 -0600] "GET /moviecash.gif HTTP/1.0" 200 5528 "http://www.melvilletheatre.com/" "Mozilla/5.0 (X11; U; Linux x86_64; en-US; rv:1.8.1.14) Gecko/20080416 Fedora/2.0.0.14-1.fc8 Firefox/2.0.0.14"
1.1.1.1 - - [25/Apr/2008:02:42:40 -0600] "GET /ballteambingo.png HTTP/1.0" 200 11064 "http://www.melvilletheatre.com/" "Mozilla/5.0 (X11; U; Linux x86_64; en-US; rv:1.8.1.14) Gecko/20080416 Fedora/2.0.0.14-1.fc8 Firefox/2.0.0.14"
2.2.2.2 - - [25/Apr/2008:02:42:39 -0600] "GET /cottoncandysmall.png HTTP/1.0" 200 16389 "http://www.melvilletheatre.com/" "Mozilla/5.0 (X11; U; Linux x86_64; en-US; rv:1.8.1.14) Gecko/20080416 Fedora/2.0.0.14-1.fc8 Firefox/2.0.0.14"
1.1.1.1 - - [25/Apr/2008:02:42:39 -0600] "GET /hollywoodmoviemoney.jpg HTTP/1.0" 200 25421 "http://www.melvilletheatre.com/" "Mozilla/5.0 (X11; U; Linux x86_64; en-US; rv:1.8.1.14) Gecko/20080416 Fedora/2.0.0.14-1.fc8 Firefox/2.0.0.14"
2.2.2.2 - - [25/Apr/2008:02:42:40 -0600] "GET /favicon.ico HTTP/1.0" 200 1406 "-" "Mozilla/5.0 (X11; U; Linux x86_64; en-US; rv:1.8.1.14) Gecko/20080416 Fedora/2.0.0.14-1.fc8 Firefox/2.0.0.14"
The first IP address (1.1.1.1) downloads the main index page on melvilletheatre.com on my cable modem connection, and then proceeds to download two of the graphics. The second IP address (2.2.2.2) downloads the other seven graphics on that web page via my DSL modem connection.
From the point of view of the user of the computer that downloaded this web page, all I see is that the web page loaded and displayed very quickly, faster than it would have if I was using just one single Internet connection. Why? Because I was pulling in data through both of my Internet connections at the same time. From the point of view of the webserver, two separate users just downloaded half of the website. It's like having two straws in a cup of soda – you can move a larger volume of liquid (or data) than you can with a single straw.
EQUIPMENT REQUIRED
The only special item that you need to use two Internet connections is a load balancing router. I got a Dlink DI-LB604 router. The only physical difference between this load balancing router and a regular one is that this has two WAN ports on the back, one for each of your modems. You can use two cable modems, two DSL modems, or one cable and one DSL modem. I have two Internet services from two different ISP's, and I have one cable modem and one DSL modem.
If you want to have wireless Internet capability too, then you can also attach a regular wireless router to this setup. This requires a crossover ethernet cable because you're plugging one router into another one; a standard ethernet cable won't work.
LOAD BALANCING ROUTER SETUP
The first thing that I did when I got this DI-Lb604 router was to go to Dlink's website and download the latest firmware for it. This firmware identifies itself as “Firmware Version:v.1.01 .03 Built Date: Nov 14 2006”. I have no idea what the difference between this and the Version 1.0 firmware that was installed on this router when I got it actually is. The following descriptions and screenshots apply to firmware version 1.01.
Updated October 4, 2010 – Firmware version 1.01 doesn't work well (or at all) with encrypted (ssh) communications channels. However, updated firmware is now available for this router that appears to fix this issue. Click here to download Firmware Version:v.1.02 Built Date: Dec 16 2009. The filename is DI-604LBVPN_V102_IB0F_Formal_Release_12162009.img .
There is nothing special about the basic initial setup of a DI-LB604 router. The only difference is that you have two WAN settings to make. My DSL connection is a static IP address and my cable modem connection is a dynamic address so all I had to do was set WAN1 to “dynamic IP” and WAN2 to “static IP” and enter the static IP address, subnet mask, gateway and DNS server addresses into the fields provided.
Port Binding
Most of the special features that you need to set up on this load balancing router that you wouldn't have to set up on a regular single-connection router can be found under Tools – Misc.
A picture being worth a thousand words, here is a thousand words to describe my setup under Tools-Misc:
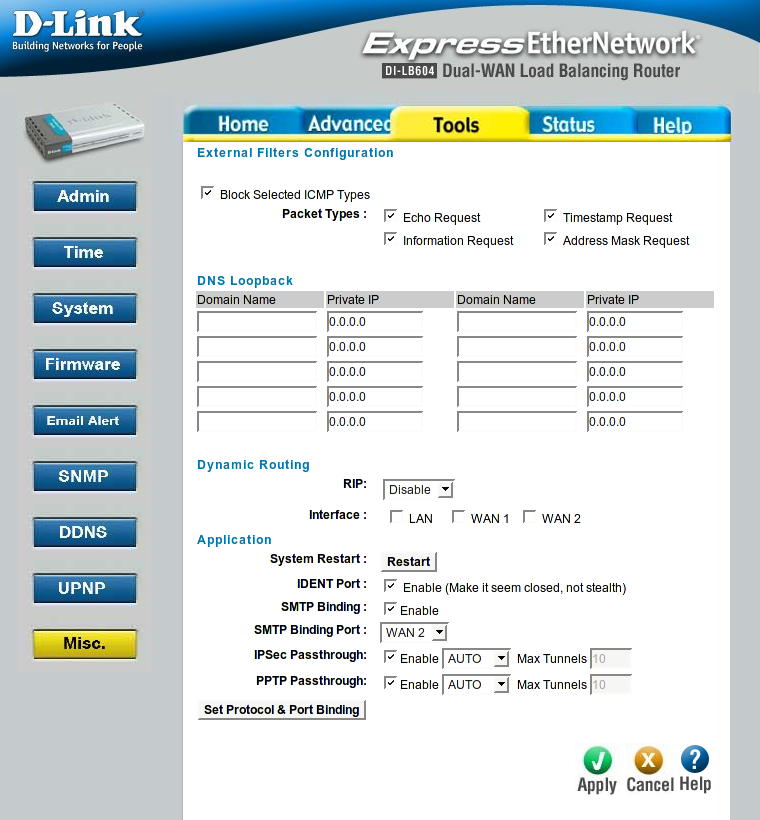
Your ISP may (probably does) require that all outbound email that you send to their server must originate from an IP address that's within their range. Checking off the SMTP Binding selection above and setting the SMTP Binding Port to the WAN port for your ISP's modem will force all of your outbound SMTP connections to use that connection.
The rest of the settings that you need to worry about can be found under the “Set Protocol & Port Binding” button at the bottom of the above screen. The objective on this screen this screen is similar to the SMTP Binding function on the Tools – Misc screen – that is to assign certain functions to run over a specified WAN port. Here is another thousand words to show my settings:
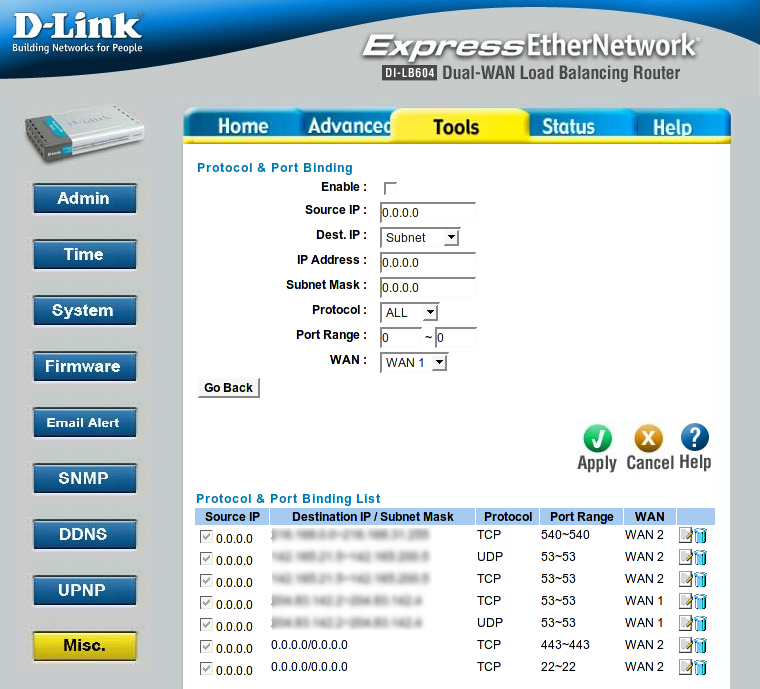
The above screen shows several settings that you may or may not require in your individual circumstance. This screen is entirely devoted to assigning ports and IP addresses to run only over one of your Internet connections.
If you aren't running your own nameserver, the most important settings are the UDP and TCP port 53. These are the ports where the computers that are attached to your load balancing router make their domain name server queries.
In the above screen, I have the DNS server addresses for my cable ISP assigned to WAN1 and the DNS server addresses for my DSL ISP assigned to WAN2.
For example, if your modem that's attached to WAN1 uses DNS server addresses 1.1.1.2 and 1.1.1.3 and your modem that's attached to WAN2 uses DNS server addresses 1.1.1.4 and 1.1.1.5 then your settings above would look like this:
1.1.1.2-1.1.1.3 TCP 53-53 WAN1
1.1.1.2-1.1.1.3 UDP 53-53 WAN1
1.1.1.4-1.1.1.5 TCP 53-53 WAN2
1.1.1.4-1.1.1.5 UDP 53-53 WAN2
Similarly, TCP port 443 is for HTTPS (HTTP over SSL, or secure HTTP). The settings shown for TCP port 443 will insure that all HTTPS connections will travel over WAN2. Failure to set this will create problems when you try to access a HTTPS website.
TCP Port 22 is for SSH connections. I have a number of webservers and the like that I connect to using SSH and most of them are configured to accept inbound connections only from a specified list of IP addresses. Therefore, if I was to attempt to log into a remote server using the wrong IP address my connection attempt would be rejected. The TCP port 22 setting above directs all SSH connections to use only WAN2, which happens to be the modem that I have with a static IP address.
The setting that I have for TCP port 540 is for a Usenet news server that requires that I log in to it only from my static IP address.
Similarly, you can lock any other port or IP address (or both) to use only one of your Internet connections depending on your individual requirements.
Load Balancing
The load balancing settings can be found under Home – Load Balance. Here is a screenshot showing my current Load Balance settings:
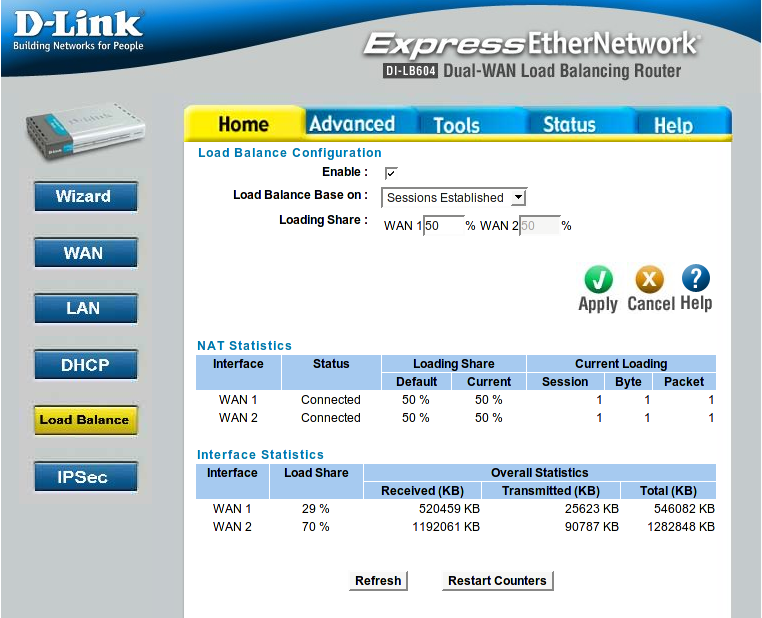
You need to set both “Load Balance Base on” and “Loading Share”. I have found that Sessions Established is the most compatible method to use as a Load Balance Base. You may want to experiment with the other options (Bytes Tx+Rx or Packets Tx+Rx) and use the one that provides you with the best results.
Loading Share is self-explanatory. You will note that the Interface Statistics shown are not very close to the 50/50 loading share that I have set. This is because I have so much stuff (my ssh connections) bound to WAN2 and a lot of data flows through there without being allowed to use WAN1. If you don't bind a lot of stuff to a particular WAN, your statistics should be a lot closer to the settings that you provide under Loading Share.
WIRELESS ACCESS
While it is a very full-featured router, the Dlink DI-LB604 is not a wireless router. Therefore, if you require wireless service as well, you will have to set up a wireless access point as well.
I have a Belkin Wireless-G router model F5D7230-4e.
All I want this wireless router to do is to act as a simple ethernet switch. Any connections to that router should be passed directly through to the load balancing router without any additional hocus pocus.
To make this work I attached a regular ethernet cable from my computer to one of the LAN ports on the wireless router, went to the wireless router's setup screen, and enabled the Wireless – Use as Access Point feature.
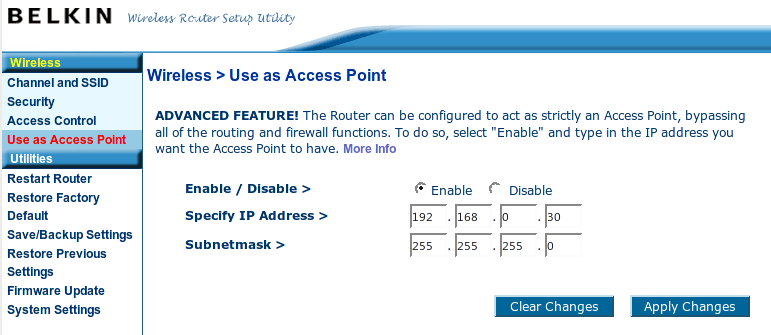
Assign the wireless router an address that's not otherwise in use on your internal network.
Now you can plug the wireless router into one of the LAN ports on the load balancing router using a crossover ethernet cable. Note that this will not work if you plug the wireless router into the load balancing router using a regular ethernet cable.
You must plug your crossover ethernet cable into one of the LAN ports on the wireless router, and into one of the LAN ports on the load balancing router. Leave the WAN port on the wireless router open – you don't need it for this application.
Now you can access the setup screen for the wireless router from any computer on your internal network by simply entering its IP address (the one that you assigned it in the previous step) in your web browser.
Now your wireless router acts like a simple ethernet switch. Anything that you plug into the other LAN ports on either router (the load balancing router or the wireless router) will work, and any wireless connection to your network will also work. At this point, there is no practical difference between plugging a network cable into a LAN port on the wireless router or plugging a network cable into a LAN port on load balancing router.
SETTING UP /ETC/RESOLV.CONF
Note: The following section applies to computers running Linux. If you are using Windows you can do this under DNS settings in the network properties.
On Linux computers, the resolv.conf file contains the names of the domain name servers that were discussed earlier under the “Load Balancing Router Setup” heading.
You need to set this up for each of the Linux computers on your network. Fortunately, they are all the same, so once you have written the first one you can just copy it to all the rest of your computers with no further editing required.
As previously discussed, we will assume that the dns server addresses for the modem that's connected to WAN 1 are 1.1.1.2 and 1.1.1.3, and the dns server addresses for the modem that's connected to WAN2 are 1.1.1.4 and 1.1.1.5.
Your resolv.conf file could look like this:
search localdomain
nameserver 1.1.1.2
nameserver 1.1.1.4
nameserver 1.1.1.3
Note that we have the nameserver entries listed in the order of primary WAN1, primary WAN2, secondary WAN1. There is no point in adding the secondary WAN2 nameserver entry because Linux currently recognizes a maximum of 3 nameservers. It doesn't appear to hurt to have a fourth entry, but it doesn't seem to do anything either.
You may want to experiment with the order of the nameservers in /etc/resolv.conf to see what gives you the best performance. Depending on your ISP, the order may make no difference or it may make a substantial difference. Linux reads resolv.conf and makes its queries in top to bottom order.
For the automatic failover function to work, you need to insure that you have at least one nameserver from each ISP specified in /etc/resolv.conf. Otherwise, if the Internet connection that talks to one ISP's nameserver goes down, you will lose your nameserver access until the connection comes back or you fix /etc/resolv.conf to access the other ISP's nameserver.
CONCLUSION
After setting all of this up as described in the article, you now have two-lane access to the Information Superhighway.
Keep on truckin'!
Other articles written by Frank Cox can be found here.
Frank Cox owns and operates the Melville Theatre in Melville, Saskatchewan, Canada, and has been playing with computers for over 30 years.
October 4, 2010
![]()
This
work is licensed under a Creative
Commons Attribution-Share Alike 2.5 Canada License.
